
You’d really think we’d know better by now, wouldn’t you? With three and a half years of upgrades, modifications, corrections and repairs as well as a good few rip-it-out-and-start-agains under our belts, many of them as a preliminary to the job we originally set out to do, we really ought to have realised that a bit of a facelift to the downstairs loo was not – not ever, never in a million years – going to be a straightforward job.
After all there had been the guttering downpipes to nowhere that on one side of the house just spewed their contents into the only dip in the lawn and on the other, all over the front step, under the front door and into the hall. Then there had been the hard-standing to the front and the rear of the house that all usefully sloped inwards, and the three external doors that fitted so badly you could see daylight through the gaps between door and frame. And then there was the metre’s depth of sodden mud packed up against several metres of completely un-tanked, north-facing outside wall. Not forgetting the bathroom floor that sloped away from the drain, and the disastrous combination of an unsupported shower tray set in a chipboard surround, as well as the never-ending list of things that were not level, square, true or flat – and then propped up or wedged in place with tightly folded pieces of sandpaper.
But somehow, when it came to zhooshing up the very dreary and shabby downstairs loo, what came to mind was the kind of simple DIY job they feature in those half-hour home improvement shows that they stretch out to include even the initial trip to Homebase, as well as the obligatory bit of jeopardy when the homeowners find they’ve got the wrong fittings or something, followed by the inevitable happy ending consisting of interviews with the DIY-ers proudly admiring their handiwork, as well as a long sequence of before and after shots. I mean, to quote Mr Blue-Shirt, how difficult could it be? After all, the job only involved sloshing a bit of white emulsion around, replacing the washbasin, tap and vanity unit, adding a tiled splashback and pointing the brickwork floor tiles: a week’s work at the most. And we’d already got off to a cracking start having found both the perfect tiles (with a stack of extras left over from a box that had split thrown in for free) and the perfect washbasin, tap and vanity unit (complete with a 50% discount as everything was an end of line) on a single trip to pretty well the only DIY store lockdown restrictions allowed us to get to.
The excitement of these early victories, however, made us lose sight of that old adage about those failing to learn the lessons of history being condemned to repeat them, which in our case turns out to apply just as much to home improvements as it does to world affairs. For no sooner had we lifted the basin out and dismantled the homemade cupboard beneath it than the latest set of bodges started to rear their ugly heads. First there was the mix of UK and EU pipe unions on the water supply to the washbasin that are not actually compatible and so were held together with huge, chewing-gum-like blobs of epoxy-metal to stop the otherwise inevitable leaks. With this having set alarm bells ringing, Mr Blue-Shirt thought it prudent to check the unions to the radiator, and sure enough, he found the same leak-waiting-to-happen there too. So that had just doubled that part of the plumbing work. Sigh…
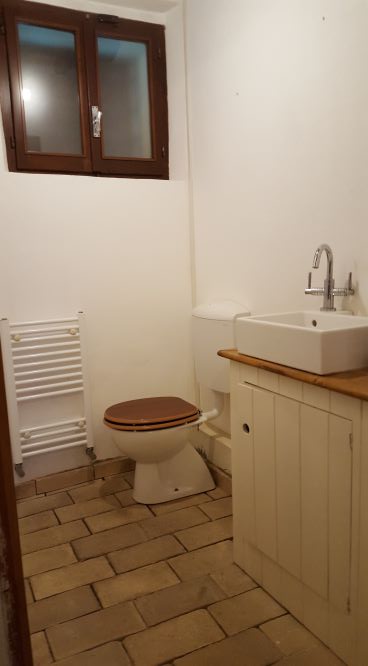
The next problem to come to light was that the reason why the loo itself had been located several centimetres further away from the wall and from the cistern than ideal – and had always looked extra-ugly as a result – was that the outlet pipe from the basin, which runs behind the loo and out to the drain, had not been recessed fully and so had been crudely boxed in (we had always wondered what the strange, low-level platform behind the loo was). So to get the loo to fit properly, Mr Blue-Shirt had to rip out the massively over-engineered boxing-in, chisel a channel into the concrete floor to fully recess the outlet pipe, and then move the soil pipe back, having first lifted the surrounding brick slip floor tiles – which was when Mr Blue-Shirt also discovered that there was only builder’s foam instead of proper screed under a sizeable section of the tiles, thereby adding yet another job to the list. Sigh…
But at least this made it easier to centre the soil pipe and the loo between the wall and the washbasin; why it had been shoved up so close to the far wall had long been a mystery. At that point, as it was already going to take so much work just to get the existing and extremely basic loo to fit properly, we decided we might as well treat ourselves to new loo too. Although that also proved way more difficult than anticipated– all to do with U-bend shapes, apparently – and even once we had found the right combination of what we needed and what we liked (a surprisingly elusive pairing), it took three attempts (and an additional two weeks) to get an unbroken loo delivered to us. Sigh…
So now, already over a month into the job, we ‘just’ need to complete the new pipework, make good all the holes and channels from the old pipework, re-concrete and re-tile part of the floor and instal the new loo…and then we might just be ready to begin the job we originally set out to do.
It’s just as well we won’t be able to have friends over for lunch any time soon…
